
Understanding and Creating Ansible Execution Environments

Ansible Execution Environments (EE) may raise some questions among Ansible Automation Platform users.
EEs were introduced in the 2.0 release of the Ansible Automation Platform as a first initiative to separate the control and execution planes of automation and provide better scalability for both developers and administrators With the release of Ansible Automation Platform 2.1, this strategy was fueled with Automation Mesh. Both are intrinsically related and provide the ability to automate in a distributed, scalable way and across different types of infrastructures and clouds
Motivation: Python libraries and dependencies
Ansible is a tool written in Python and uses YAML declarative language to describe the desired state of devices and configurations.
However, Python-based applications have an essential characteristic: they usually need packages and modules not included in Python standard library.
Sometimes, applications need a specific library version with a particular fixed bug or written using a distinctive feature or integration.
As an illustration, the table below shows the various versions of Python associated with control and management nodes for specific Ansible core versions.

Ansible was born as a monolithic architecture; growing the ability to run automation meant that the entire automation cluster needed to be scaled out as needed.
It has a limited ability to run automation to a single cluster. Thus, architectural options were limited for architects. It was often necessary to deploy multiple Ansible clusters or isolated nodes to expand automation capacity across different regions or networks, making it sensitive to network latency and connection interruptions.
To overcome these limitations, new capabilities were added, such as using virtual environments (venv) from Python and implementing “isolated nodes.”
Virtual Environments and Isolated Nodes
Virtual environments (vevs) are independent directory trees within Ansible Tower: a folder containing all the executables and dependencies needed for a specific version of Python.
IT allowed you to add or update modules to Ansible and, per your requirements, to run specific playbooks. One application could have its virtual environment with Python version 2.7 installed, while another application has another virtual environment associated with it with version 3.5.
Updating a library for a particular application would not affect the other applications associated with other venvs – as they were isolated by independent directories in Tower.

Another function created over time was the “Isolated Node” figure, aiming to bring more architecture options, especially when links were interconnecting to managed devices hosted in remote locations or the segmentation of networks with firewalls.
In these scenarios, it was possible to implement an isolated node. It was nothing more than an Ansible Tower node with a much smaller software package capable of running playbooks locally.
Periodically, the Ansible Tower master node communicated via SSH with the isolated nodes to synchronize configurations and update automation jobs.

Evolution to Automation Mesh
Still, implementing and maintaining a distributed architecture presented many challenges.
With virtual environments, it was necessary to have an internal administration team maintaining dozens of virtual environments (virtual environments) for various types of groups that consume automation.
Some teams might need different versions of Ansible; network teams require other automation content and dependencies to automate their devices, and developers need to create their test environments.
The implementation of isolated nodes also presented its challenges. Communication between the Ansible Tower master and the isolated nodes was unidirectional. There was still a sensitivity to communication latency, and in many cases, it was necessary to implement intermediate nodes such as SSH proxies or jump nodes to mitigate it.
Automation Mesh was made available in Ansible Automatiom Platform 2.1 to work around these limitations.
It makes use of an upstream community project called receiver.
The receiver creates an overlay network over the existing network. A receiver application will run as a daemon on each node associated with this overlay network.
Once connected, these nodes form a mesh-like network capable of providing datagram (as in UDP) and stream services (as in TCP) to the applications hosted on them.
With the ability to connect remotely, reliably, and overlay, it was possible to evolve to a truly distributed architecture in Ansible. The control plane started to be segregated from the execution plan, allowing to deliver and execute the automation closer to the devices and in a more straightforward, replicable, and modular way.

In this new distributed architecture, driven by Automation Mesh, there are now four types of nodes:
- Control Plane Nodes: accessed by users through WebUI and API. Execution features are disabled on these nodes.
- Execution Nodes: these are where the Ansible playbooks will run. This node will run an execution environment that will run the Ansible playbooks according to the needs and requirements of the applications and elements being automated.
- Hop Nodes: optional nodes used to interconnect and allow communication between control and execution nodes.
- Hybrid Nodes: capable of simultaneously executing and implementing automation and controller functions.

Execution Environments and Execution Nodes
Execution Environments, formerly called Ansible Engine, allow overcoming many of the operational challenges that existed with virtual environments and isolated nodes
Unlike virtual environments, executions environments are container images. It allows the use of a custom image containing what is needed to run the automation jobs a managed node needs.
An image of an EE container contains the following components:
- RHEL UBI 8 as OS;
- The desired version of Ansible Core;
- Python version 3.8 and its dependencies;
- Bindep and its dependencies;
- Any Ansible collection and its specific dependencies.
So we moved on to a customizable and standardized automation package that contains all the components needed to deliver automation, including dependencies and a version of Ansible. A Red Hat Linux image supports all of them.

The executions nodes then run the execution environment associated with them to deliver automation to managed devices.
And the execution nodes with their associated execution environments can be deployed in different locations and closer to the devices, reducing latency and applying automation autonomously.
In addition, an execution environment scales separately and as needed, delivering greater granularity in resource allocation and simpler scale-out.
The figure below shows how it is possible to associate an execution environment with a job template in Ansible Automation Controller. In this example, we have a hybrid node

The following EEs are preconfigured and available natively in AAP:
- Minimal (ee-minimal-rhel8): contains Ansible-2.11 built on top of UBI8 and python-3.8. This image does not contain any Collections. We can use it as the base image to create different executions environments with your custom collections or the certified content collections available on the Ansible Automation Hub.
- Supported (ee-supported-rhel8): this is the default image available with the automation controller. It is built on top of the minimal image and contains Ansible content collections supported by Red Hat.
- Ansible 2.9 (ee-29-rhel8): Ansible-2.9 and all its required dependencies. This image is ideal for anyone planning to migrate to Ansible Automation Platform 1.2. for Ansible Automation Platform 2.0.

Building an Execution Environment
Ansible Builder is a tool that automates the construction process of execution environments. It creates images of execution environments using dependency information defined by users and the various collections of Ansible content.
It uses a directory that acts as the build context for the container image, containing the container file and any other files added to the execution environment image.
By default, Ansible Builder´s runtime container is Podman, but Docker is also supported.
After creating an execution environment image, we can send it to a “container registry” for users to consume.
One of the main options is to make the image available to the Private Automation Hub.

Step by step to build an EE for integration with ServiceNow
In this example, we are using a hybrid node. However, nothing prevents it from being used in the Mesh context and associated with an execution node.
The first step is to install the Ansible builder.
You can install Ansible Builder using Red Hat Subscription Management to register and attach to your Red Hat Ansible Automation Platform subscription. Just run the following command:
$ dnf install ansible-builder
Once installed, we can explore the various commands and options:
ansible-builder --help

Analyzing the options for the “build” subcommand, we have:
ansible-builder build --help

The “build” subcommand creates an execution environment with environments based on a file with definitions. It fills in the build context and then invokes Podman or Docker to build the execution environment image.
Let’s check out how to populate the builder specification file and create an execution environment.
First, let’s create a “project_directory” directory, where all the files needed to build the image will be stored.
mkdir project_directory && cd project_directory

Let’s populate the “execution-environemt.yml” file with the following content:
cat <<EOT >> execution-environment.yml
—
version: 1
dependencies:
galaxy: requirements.yml
python: requirements.txt
system: bindep.txt
additional_build_steps:
prepend: |
RUN whoami
RUN cat /etc/os-release
append:
– RUN echo This is a post-install command!
– RUN ls -la /etc
EOT
In this file, we specify the dependencies related to the Galaxy collection in the “requirements.yml” file. We also specify a Python file called “requirements.txt” that will contain the pip dependencies needed to run the content. Finally, we define a “bindep.txt” file, which will hold the necessary rpm installations.

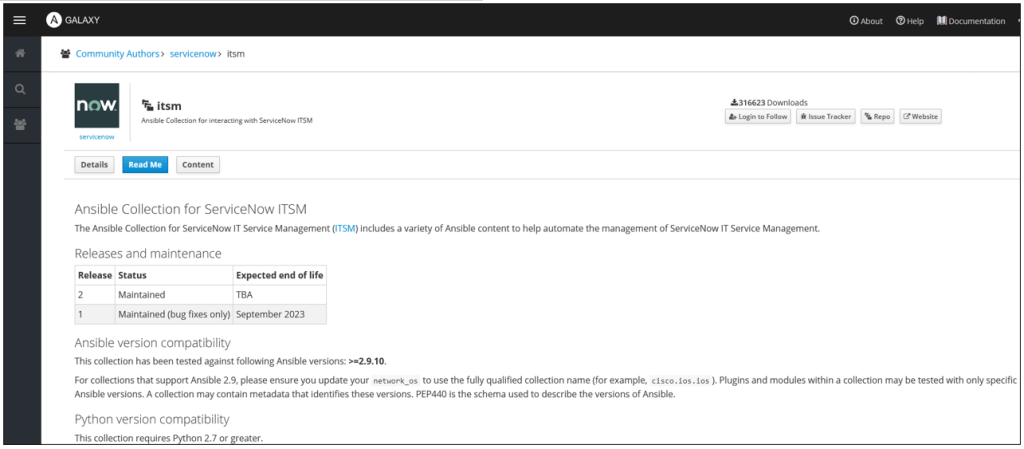
Let’s then create the “requirements.yml” file. Let’s add the servicenow.itsm collection and a collection called ansible.utils to it

The ServiceNow ITSM collection enables faster workflow creation based on ServiceNow ITSM. It is possible to automate ServiceNow service requests, including reporting the results of changes and all related information. Start a playbook to resolve common requests and reduce routine and repetitive operational tasks.
Another possibility is the automation of incident handling. Automatic incident ticket updates help meet audit requirements.
It is also possible to simplify the opening, treatment, and resolution of items within the IT service management workflow and, at the same time, keep ServiceNow’s CMDB (Configuration Management Database) updated with user, team, and asset information.
https://galaxy.ansible.com/servicenow/itsm
The ansible.utils collection is deployed to ease the management, manipulation, and validation of information in playbooks
https://galaxy.ansible.com/ansible/utils

Through the specification files “execution-environment.yml” and “requirements.yml”, we guarantee that ansible-builder will download both collections while creating the execution environment.
Also, the builder will consider all dependencies when creating the image.
cat <<EOT >> requirements.yml
—
collections:
– name: servicenow.itsm
– name: ansible.utils
EOT

Now let’s create the “requirements.txt” file. This file will contain the Python requirements we want to install via pip; they differ from those present in the individual collections specified in the “requirements.yml” file.
cat <<EOT >> requirements.txt
gcp-cli
ncclient
netaddr
paramiko
EOT

Finally, let’s create the “bindep.txt” file. This file contains the rpm requirements we want to install via dnf.
cat <<EOT >> bindep.txt
findutils [compile platform:centos-8 platform:rhel-8]
gcc [compile platform:centos-8 platform:rhel-8]
make [compile platform:centos-8 platform:rhel-8]
python38-devel [compile platform:centos-8 platform:rhel-8]
python38-cffi [platform:centos-8 platform:rhel-8]
python38-cryptography [platform:centos-8 platform:rhel-8]
python38-pycparser [platform:centos-8 platform:rhel-8]
EOT

Now run the “ansible-builder” command to create a new execution environment called “custom-ee”.
ansible-builder build -v3 -t custom-ee

The building process takes 2-4 minutes.

Run the command below to verify that the image is there:
podman images

The newly created “custom-ee” is in the Podman image list.
Now push the execution environment created to Ansible Automation Hub.
First, use the Podman login command to connect to the Private Automation Hub registry:
podman login privatehub-01.$INSTRUQT_PARTICIPANT_ID.instruqt.io

Tag “custom-ee” as an execution environment to send to the private automation hub:
podman tag localhost/custom-ee privatehub-01.$INSTRUQT_PARTICIPANT_ID.instruqt.io/custom-ee

We then push the “custom-ee”.
podman push privatehub-01.$INSTRUQT_PARTICIPANT_ID.instruqt.io/custom-ee

By logging in, we can see that the “custom-ee” has been published in the Private Automation Hub. Any user in the organization will be able to download this custom EE to run automations associated with ServiceNow.

I hope this post was helpful and may have helped to bring more details about the concept and use of Execution Environments in Ansible Automation Platform.
References:
https://www.ansible.com/blog/peeling-back-the-layers-and-understanding-automation-mesh
https://receptor.readthedocs.io/en/latest/
https://www.redhat.com/sysadmin/python-venv-ansible
https://www.redhat.com/en/interactive-labs/ansible
Discover more from CloudnRoll
Subscribe to get the latest posts sent to your email.


